This article explains how to run AlphaVM on VMware. In particular it covers the network configuration on VMware, which can be more involved than on real hardware. This is because VMware network infrastructure may filter out packets sent to and from AlphaVM.
Here we assume the following software versions and emulated Alpha parameters:
- VMware ESXi 5.5.0
- Windows Server 2012 R2
- AlphaVM-Pro 1.5.1
- Emulated Alpha DS10 6/466 with 512 RAM, a single CPU and single NIC
- If you need to use DECNET, we assume that the desired DECNET address is 1.2. DECnet changes the MAC address to something that corresponds to the DECnet address. The MAC address that corresponds to 1.2 is AA-00-04-00-02-04. You can use the DECnet address converter to determine the corresponding MAC address.
The idea of this article can also be applied to other versions of VMware, Windows and AlphaVM and other Alpha configurations, although the details may differ.
The idea is also the same when Linux or FreeBSD are used instead of Windows. The major difference is that there is no AlphaVM GUI. AlphaVM is configured by editing the configuration file.
VMware virtual machine creation and configuration.
- Create a new virtual machine. Assume it is called WS2012R2.
- Create a single disk. We set 50GB.
- Create 2 E1000 NICs.
- The first NIC will be used for communication between Windows and the outer world. For instance, you will download AlphaVM software via this network.
- The second NIC will be used by the AlphaVM NIC. We call it a dedicated NIC, because it will be used only by AlphaVM. If you need more NICs in your virtual Alpha, create a VMware NIC for each Alpha NIC. On ESXi the NIC does not pass Ethernet packets targeted to a MAC address different from the NIC’s MAC address. This is the reason why NIC sharing does not work with ESXi and why a edicated NIC is required for each emulated NIC.
- If you need to use DECNET, set the second NIC MAC address to the desired DECNET MAC address (AA-00-04-00-02-04). Otherwise, leave the MAC address at the default value provided by VMware. DECNET changes the MAC address to something that corresponds to the DECNET address. In our example the DECNET address is 1.2 and the corresponding MAC is AA-00-04-00-02-04. Assume the original VMware NIC MAC is 00-0C-29-9A-7B-28. There is a problem when DECNET changes the address from 00-0C-29-9A-7B-28 to AA-00-04-00-02-04. VMware NIC would not deliver packets to the new MAC address AA-00-04-00-02-04, because it delivers only to 00-0C-29-9A-7B-28. The problem can be solved by setting the VMware NIC MAC address to AA-00-04-00-02-04, which means that the address would not change. It is always and everywhere the same AA-00-04-00-02-04: in VMware, Windows, AlphaVM and VMS. Please note that newer versions of VMware allow to configure the VMware network infrastructure in such a way that they let all packets through. In that case you do not warry about the MAC address changes.
- Configure 2 CPU cores.
- Configure the memory size. We set 3Gb.
- Install Windows on the VMware virtual machine.
Windows configuration.
Windows will have two NICs, one for each VMware NIC.
- The first NIC is called “Ethernet”. It will be used for communication between Windows and the outer world. For instance, you will download AlphaVM software via this network. This NIC should be configured as usual. The default DHCP configuration may suffice.
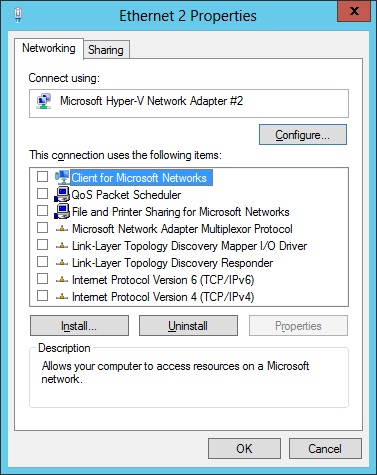
- The second NIC is called “Ethernet 2”. It will be used solely by AlphaVM. All Windows protocols have to be disabled on this NIC, otherwise both Windows IP stack and VMS/Tru64 IP stack would use the same MAC address. The protocols are disabled as follows:
- Right-click on the network icon on the right side of the task bar and select “Open Network and Sharing Center”.
- Select “Change adapter settings” on the left side of the form.
- Right-click on the desired adapter, for instance “Ethernet 2”, and select Properties.
- Disable all the protocols as shown below.
AlphaVM configuration.
- Install AlphaVM.
- Configure the system type to DS10 6/466.
- For AlphaVM-Pro you may wish to set the CPU server fro basic to JIT2. AlphaVM-Free supports only the basic server.
- Set Alpha memory size. We assume 512MB here.
- Create SCSI controller.
- Create a disk. Set the disk image to whatever image you will to use. If you need an empty disk, create it first using the disk creator available via the Tools menu.
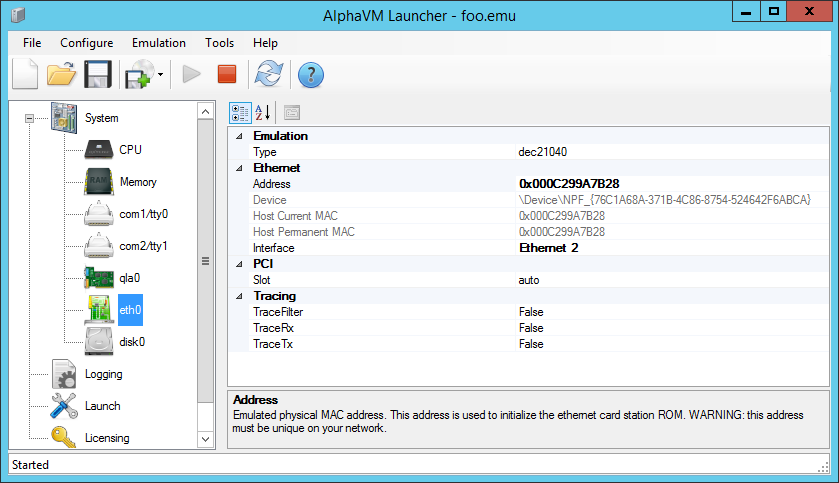
- Create a NIC. Map it to “Ethernet 2”. Set the MAC address to the same MAC address as the host MAC address. The host MAC address is the MAC address of the VMware NIC. It is displayed by the AlphaVM GUI next to the AlphaVM MAC address. Note that if you use DECNET, the DECNET MAC address (AA-00-04-00-02-04) will be your host MAC address here. Remember, we configured the VMware NIC with this address. WARNING: if you have multiple Alpha NICs, each of them needs a separate dedicated VMware NIC with unique MAC addresss.
- Configure the licensing. The licensing configuration instructions are provided when you purchase the software.
- Now you are ready to boot AlphaVM.
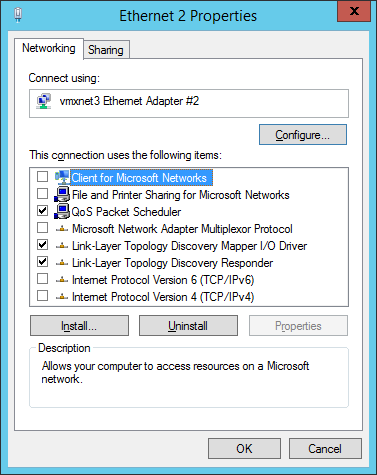
Using VMXNET3 NICs
You can use the VMware VMXNET3 NIC instead of the E1000 NICs. However, the VMXNET3 NIC does not pass any RX packets when all Windows protocols are disabled. It has to do with tighter integration of this para-virtualized NIC with VMware and Windows.
The solution is to leave some Windows protocols enabled, which makes sure that the NIC is active.